Archives

Yuletide Carol Paper Pack Blog Hop

Welcome to the November Damask Divas Blog Hop featuring the Close to my Heart Yuletide Carol paper pack.  If you got here from Lilian’s blog post, you are in the right place.  You can always go to the Damask Divas blog to start at the beginning by clicking here.

This paper pack is traditional with red, green and muted holiday themes.  To be honest, I don’t scrapbook nearly as much as I make cards and home décor items.  The patterns on this paper called out to be a scrapbook layout however.  I am very happy with the two page layout I made.  I hope it inspires you too!

yuletide carol2 pic

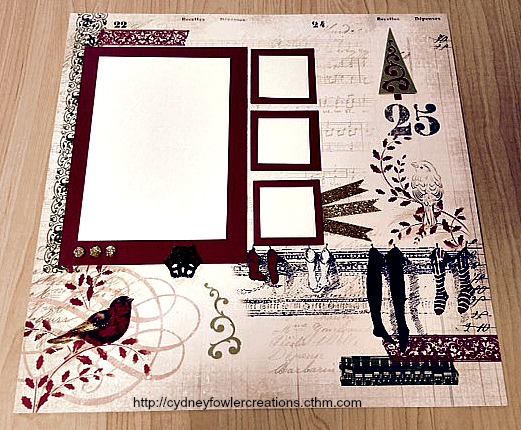
I like the designs printed on this paper, especially the birds and stockings.  It was easy to build a page around the design.  I added a small tree from the Artiste Close to my Heart Cricut cartridge just above the 25 that was already part of the page.  The negative cutout from the tree is to the right of the red bird in the lower left corner.  I added the four photo mats, the shimmer trim, the tree and the negative from the tree along with the sparkles and metal component from the Yuletide Carol assortment of embellishments.  The rest of the design you see is all part of the paper.

The other page was a more neutral design featuring the look of sheet music.  I cut the fancy border at the bottom of the page (also from the Artiste Close to my Heart cartridge) and the top Holly and Ivy border is the zip strip from the same page.  I added gold shimmer trim, stickers from the Yuletide Carol complements pack (the banners and holly) and more embellishments from the Yuletide Carol assortment pack.   The Noel decoration is a pocket card from the Artfully Sent Close to my Heart Cricut cartridge.  I cut it at about 3″ by 2 1/4″.

yuletide carol3pic

Here is a photo of the two pages side-by-side.

yuletide carol1 pic

All that this two page layout needs are three 4×6 photos and three small images to complete it.  The photos can cover the colonial white “place holders”  or the photos can be cropped a little to achieve a double mat effect.  The photos do not do the shimmer trim and glittery bling gems justice. They add a nice sparkle to the layout without overwhelming the design.

Recipe:

Artiste Cricut Cartridge – Item #Z1790

Artfully Sent Cricut Cartridge – Item #Z3017

Yuletide Carol paper pack – Item # X7187B

Yuletide Carol Complements – Item # X7187C

Yuletide Carol Assortment – Item # Z3007

Gold Shimmer Trim – Item #Z1985

I cut the shapes from the exclusive Close to my Heart Cricut cartridges on my Cricut Explore.  For those of you using the Explore, here are the codes to make searching for these images easier.   Artiste – #S20E, Artfully Sent – #S124E3,  Tree – #M3EB1C, Pocket Card – #MCC236.  You can use these codes from “Search All Items”.  Be sure to enter the # sign to search.

To purchase any of the supplies for this project, you can visit my online CTMH shop at this link –  http://cydneyfowlercreations.ctmh.com or if you have your own consultant, visit their online business address.  I am happy to help in any way.  My contact information is available at my online CTMH shop.  Be sure to check out our monthly special and Stamp of the Month.

Looks like I am the last stop on this blog hop.  I hope you were inspired by all of our creations.  Be sure to visit our blog hop each month to see the new projects we have created.  Happy Crafting!

We hope you had as much fun browsing our creations as we had making them! Thanks so much for hopping with us–now go get your crafty on!


October Stamp of the Month – Close To My Heart

Here we are – officially in the fall season with the holidays just around the corner.  The Christmas themed October Stamp of the Month (SOTM), Home for the Holidays, is available for a limited time.  It can be yours for just $5.00 with a $50 purchase but it is only available to you during October.   You can also purchase the October Stamp of the Month for $17.95 without a qualifying purchase.   I especially love the polar bear image.  The set coordinates with the Art Philosophy cartridge and provides measurements to cut pieces for all but two of the images (the candy cane and candy don’t have images on Art Philosophy but all of the others do) .   Here is a sample set I cut out using the CTMH Art Philosophy Cricut cartridge and stamped.

Samples stamped with the October SOTM

Samples stamped with the October SOTM

I also made two cards with the polar bear postage stamp.  One with glitter paper and the other with paper from the Snowhaven paper pack.  So cute!

october SOTM polar bear cards pic


You can purchase the Stamp of the Month and the supplies online at my Close to my Heart business address at http://cydneyfowlercreations.ctmh.com.

Recipes:

October Stamp of the Month “Home for the Holidays” Item #S1410

the “Winter Wishes” phrase is from the stamp set To You and Yours, Item #B1403

The “Snow Much Fun” phrase and snowflakes are from Flakey Friends, Item # C1506

Art Philosophy Cricut Cartridge Item # Z1686

Snowhaven Paper Pack Item # X7188C

Teal Glitter Paper Item # Z1991

Silver Shimmer Trim # Z1799

White Daisy Bulk pack of card bases and envelopes Item #X254

White Daisy Paper Item # 1385

Ink Pads:  Glacier #Z2641, Topiary #Z2155, Ponderosa Pine #Z2145, Ruby # Z2170.  The bright red on the December 25 tag is Holiday Red and that is a discontinued color, but you can use Cranberry in its place, #Z2116.

If you are using the Cricut Explore die cut machine instead of a legacy model, you can insert codes in search to find the cuts on Art Philosophy.   Be sure to be at search all images and enter the code with the # in front of it.  Light bulb shape ornament tag is #M41BE5;  Polar bear stamp is #M450F2, the Home for the Holidays tag is #M45A94, The Do Not Open tag is #M45080 and the larger ornament is #M4003B.

I hope you enjoy this peek at the possibilities using the October Stamp of the Month!  Leave a comment below or if you have questions, please feel free to email me at cydneyfowlercreations@gmail.com and I will respond as soon as possible.  Click here to be directed to my online CTMH shop.


Pathfinding Blog Hop

Welcome to the Damask Divas October Blog Hop!  Fall is in the air and we are featuring the Pathfinding paper pack – autumn colors galore!  If you got here from Lilian’s blog, you are in the right place.  You can always go to the Damask Divas blog site to see all of the inspiring projects – just click here.

I made a 5×7 greeting card using the Pathfinding paper pack.  I used the new Artfully Sent exclusive Close to my Heart Cricut cartridge to make the card base, envelope and envelope liner.  I used my Cricut Explore and Design Space to Print then Cut the pumpkin, sentiment and leaves (these are from Artiste).  If you don’t have the Explore you can just cut paper items in the usual way using Artiste and your Expression or E2 machine for the embellishments.

Card base made with Artfully Sent

Card base made with Artfully Sent

If you are using your Expression or E2, set the card base size according to the booklet on page 39 and page 47 for the envelope and liner.  If you are using the Explore, set the size for the card base to cut at 9.34″ wide by 11.31 height.  Set the envelope and liner to cut at 10″ wide with 7″ height.  This gives you a little extra room in the envelope for a thick card.

In Design Space you can locate items to cut by their assigned number.  Here are the numbers for the cuts I used:

Frame Card – #M1011E3

Envelope – #MEF85D

Pumpkin – #M3D514

Give Thanks and Leaves – these are part of the Harvest Layout and the items are grouped together.  #MB0171 is the number.  To use just the Give Thanks and the leaves, ungroup them.  Hide what you don’t need by clicking on the eye for each item you want to hide.  For Print then Cut – change colors to suit your theme, flatten, select all, attach.

To use the codes, make sure you put the # sign in front of the number.  Insert images, make sure you are in all images.  In the search box type the #number and hit enter.  You should see a preview of the image.  Click on the preview to insert the image.  The image codes start with #M and the cartridge codes for the CTMH cartridges start with #S.  This allows you to search for the cartridge image set in search in the same way as the images.  It is a real time saver.

Artfully Sent is #S124E3

Artbooking is #S54A

Artiste is #S20E

Art Philosophy is #S13C

Recipe for the Card:

Pathfinding paper pack – Item # X7186B

Artfully Sent Cricut Collection – Item # Z3017

Artiste Cricut Collection – Item # Z1790

Colonial White Paper – Item # 1388

You can purchase Close to my Heart products from me at http://cydneyfowlercreations.ctmh.com or from your own consultant.

I hope you enjoyed my card and information on using the Cricut Explore.  You can make this project with your legacy machines, but I am hooked on the new Explore and Design Space.  Combined with our CTMH Cricut cartridges and CTMH papers it is amazing what you can do.

I am the “end of the line” for this blog hop.  If you want to start again, click on the link at the top of the page to return to the Damask Divas blog page.  Thanks for joining us!


Scaredy Cat Blog Hop

Welcome to our September Damask Divas blog hop featuring the Close to my Heart paper pack, Scaredy Cat.  Halloween will be here before we know it!  If you came here from Lilian’s blog, then you are in the right place.  You can always click here to go to the Damask Divas blog page and view all that it has to offer including a complete list of blog hop participants.

I could not resist creating a Halloween themed wreath with these papers.   Of course, the color palette does not limit you to Halloween since most of the pack are bright patterns you can use for other themes.  I really liked the actual Halloween themed page in the pack and I fussy cut some of the cute designs and sayings from it to include on my wreath.  I love rosettes so I decided to make the wreath with a variety of rosettes in different sizes using each of the patterned papers in the pack.  I also used the metal pieces from the Scaredy Cat assortment to add interesting accents and was able to bend them a little to fit the round of the wreath base. They are a little hard to see in the photo, but they are tucked between the rosettes and one is on the front of the bottom rosette.  I wrapped the wreath base in burlap ribbon and orange organza ribbon.  The bow is black tulle.  I think it is a fun little project.

Halloween Wreath Using Scaredy Cat Paper Pack

Halloween Wreath Using Scaredy Cat Paper Pack

I cut the rosette strips by hand, but you can also cut them from the CTMH Artiste Cricut cartridge and have fun details on the edges.  I scored them using my scoreboard and used liquid glass to glue them together.  You glue the accordion pleated end to end to make a circle. The smaller rosettes are a strip of paper 1 1/4″ by 12″ scored at 1/4″ intervals to make a 2.5″ round rosette.  The middle size is two strips of 2″ by 12″, scored at 1/2″ intervals and glue the two together to make a 4″ round rosette.  The largest is 2 1/2″ by 12″ scored at 1/2″ intervals – also two strips glued together for a 5″ round rosette.  You will need one inch paper circles (two for each rosette) to hold them together. You can then add an embellishment over the circle as I did or leave them showing if you use coordinating paper for the circles.  The trick is to have your accordion pleated circle sitting on your work table and push the middle together while pulling the outside edges out.  Have your circles ready with the glue on them.  Push the circle as tight into the middle as you would like and press a circle on until the glue is holding, then flip it over and glue the circle on the other side.   I used hot glue to glue them to the wreath, but liquid glass would work too.

Recipe:

Scaredy Cat paper pack – item # X7185B

Scaredy Cat Assortment – item # Z3011

Liquid Glass – item # Z679

Score Board – Item # Z1937 (I already had a scoreboard, but if you need one, check out CTMH’s new scoreboard!)

You will also need a wreath base,  ribbons to wrap the base, unless you use a grapevine wreath, and wide ribbon or tulle for a bow.

Visit my online shop at http://cydneyfowlercreations.ctmh.com to purchase CTMH items or contact your own Close to my Heart Independent Consultant.  Don’t forget to check out the CTMH Stamp of the Month program and special purchase offers each month.

I hope this project inspires you!  The next stop on the blog hop is Melissa’s.   Click here to see her project!  Enjoy and Happy Crafting!


Chalk It Up Blog Hop

Welcome to the Damask Divas August Blog Hop featuring the Chalk It Up paper pack.  If you got here from Judy’s blog, you are in the right place.  You can always go to the Damask Divas blog to start from the beginning and/or to see the entire list of participants.  I created a cute card using the featured papers and the new Great Job stamp set.   I used the Colonial White pigment ink pad so it looked like chalk on the black paper.  Remember to let the pigment ink dry well.  It goes on thick so I blotted it to make it look more see through like chalk.  I fussy cut the Great Job and the shooting star shapes out.  I used the new Touch markers to color the shooting stars and pop dotted them for dimension.  I also used the zip strip from the graphics paper to make a “ribbon” under the saying.  The smaller black square is the reverse of the paper that also has a chalkboard look to it.  The card base is Colonial White.  I like to use the pre-made CTMH card bases that come with envelopes.  You get a pack of 50 cards and envelopes for $14.95 and they look professional.  I used archival ink to stamp the shooting stars since I was going to color them in with markers.  The archival ink won’t bleed from the markers.

A2 size greeting card - Chalk It Up

A2 size greeting card – Chalk It Up

Recipe:

Chalk It Up paper pack – Item #Z7184B

Colonial White Pigment Ink Pad – Item #Z2168

Black Cardstock paper scrap to stamp Great Job and cut out

Archival Black Ink Pad – Item #44751

Great Job stamp set – Item #C1588

Touch Markers – YR26 Pastel Peach, R140 Lt Orange, B68 Turquoise Blue

I hope this card inspires you to make your own creations.  To shop for these items and many more exciting items from the new Annual Inspirations Idea Book, go to my personal online CTMH store at http://cydneyfowlercreations.ctmh.com or contact your own consultant.  We are always happy to assist you.

Next up on the blog hop is Hilary.  Click here to go to her blog and enjoy even more Chalk It Up inspiration!  Happy Crafting!

Cards featuring CTMH July Stamp of the Month

I needed two thank you cards for my convention roomie/friends.  I used the July Stamp of the Month, Circus Alphabet (Item #S1407).  This is also a sneak peek at the new Shin-Han markers CTMH is unveiling in the August Annual Inspirations Idea Book.  I love the way they color!  Also a sneak peek at one of the new washi tapes, Topiary (item #Z2002), that is also available in August.  I used various CTMH solid colors to make the festive banner for the multi-color card, and Skylark paper for the green card.  Notice that I cut one inch squares to stamp the individual letters on – that way if you mess up coloring you can do one letter over and the letters are easy to line up this way.  Also, don’t hesitate to stamp letters in a random, wavy pattern if you have trouble lining the stamps up perfectly straight.  Perfect is the enemy of good!  Have fun with stamping and creating!  The Skylark paper pack is available until the end of July (Item #X7177B).  Get your favorite papers before the end of July!  All of the B&T duos patterned papers will be replaced with exciting new designs effective August 1.

Here are the two cards I made for my wonderful friends, Kelle and Erin:

Green Thank You card with the Circus Alphabet and Topiary Washi Tape.

Green Thank You card with the Circus Alphabet and Topiary Washi Tape.

Multi-Color Thank You card made with the Circus Alphabet.

Multi-Color Thank You card made with the Circus Alphabet.


Don’t forget – you can only get this cute alphabet stamp set during July.  Retail is $17.95, but you can get it for $5.00 with any $50 purchase during July.  My personal online CTMH shop is located at http://cydneyfowlercreations.ctmh.com.  Click on the link to shop.

Thanks for stopping by my blog!  Watch for regular posts featuring more wonderful Close to my Heart products.  Happy Crafting!


Faux Leather Handmade Journal

I made this journal for my brother to commemorate his graduation from college with a Masters in Humanities.  Now that he has received his gift, I can share.

Faux Leather Journal

Faux Leather Journal

I made the faux leather using Close to my Heart Kraft paper, CTMH inks and my Cinch book binding machine.  The journal pages are from http://www.printablepaper.net.  He offers all kinds of free templates and pages to download.  It is a great site.  I printed the journal pages double sided and punched with the Cinch.

To make the faux leather, I wet two 12×12 pieces of Kraft paper with a spray bottle of water.  I crumpled and un-crumpled the wet paper until I liked the texture.  I then ironed the papers smooth.  I took three colors of CTMH ink – Cocoa, Brown Bag and Desert Sand and wiped them over the textured paper.  Brown Bag is no longer available, but Saddle would be an equivalent color.  I started with the darkest (Cocoa), then medium (Brown Bag) then the lightest (Desert Sand) and layered them on until I liked the look.  I then wet the papers again to let the ink spread a bit.  I ironed the papers again, putting them between parchment paper to iron so ink didn’t get on the board or iron.  Once it was dry, I coated the papers with Microglaze (a wax product you can purchase in craft stores online) to give it more of a leather feel and to seal the ink.  I then punched the faux leather paper and glued it to chipboard covers.   I put some Colonial White papers on the inside covers and used the Desert Sand ink to give it some highlights like old paper.  I bound the journal pages and the covers together using a spiral binding.  I glued wooden beads on the tips of spiral to keep them from slipping out of the end holes instead of just bending the ends.  If you don’t have a Cinch or similar book binding tool, then you can punch holes and thread cords or rings through the covers and pages.

I really like the way this turned out and my brother loved it.  Here are some additional photos:

Back inside cover

Back inside cover

Journal pages

Journal pages

I printed the journal pages double sided by putting the second side back through the printer ensuring the word Journal would be in the right place.  For my printer, I placed print side up, top into the printer first and it worked great.  Just try it on a sample until it is correct before printing the whole batch, then make a note of what worked.

Faux leather close up

Faux leather close up

I really like this.  The journal is 8″ by 8″ so I had some scraps left from the 12 by 12 papers.  My husband liked the look, so I made him a smaller 3″ by 5″ index card note book with some of the scrap for him to write down website addresses and info.

If you would like to purchase Close to my Heart products please go to my online store at http://cydneyfowlercreations.ctmh.com or by clicking this link.  Here is the CTMH supply list:

Kraft Cardstock Item# Z1375 $9.50 for 24 sheets

Cocoa Stamp Pad Item# Z2114 $5.25

Saddle Stamp Pad Item# Z2171 $5.25

Desert Sand Stamp Pad Item# Z2118 $5.25